It may seem overwhelming to figure out the best way to customize your invoices in QuickBooks Online. But, once you get a basic understanding of what is available and where you make the changes, then you should be good to go.
Where to Go to Customize Your Invoices in QuickBooks Online
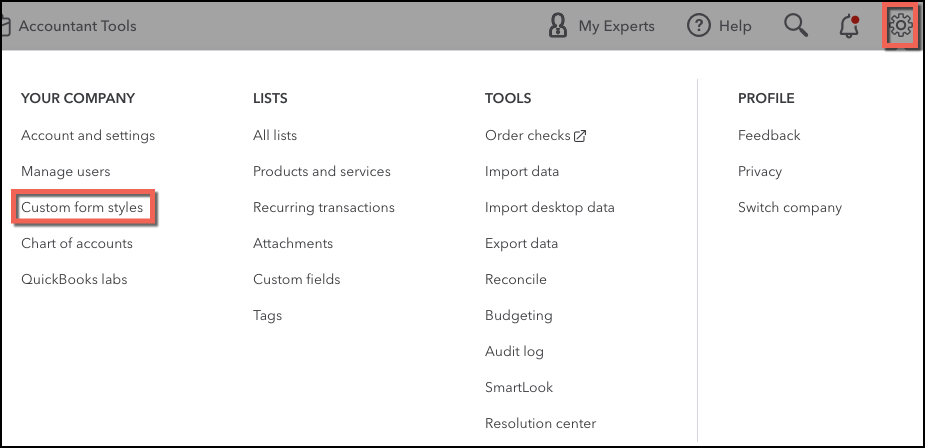
First, you are going to navigate to “Custom form styles”
Click the Gear icon (top-right)
Click “Custom form styles” under “Your Company”
Once there, you will see that you have at least 1 default invoice style. You can edit this or add new styles.
The types of sales forms you can create are
Invoice
Estimate
Sales receipt
For the purposes of the blog post, I’m going to focus on just the Invoice form.
Note: I would recommend ignoring the “Import style”. This usually does not work out how you would want it to. It is best to stick with the options available to you from QuickBooks Online.
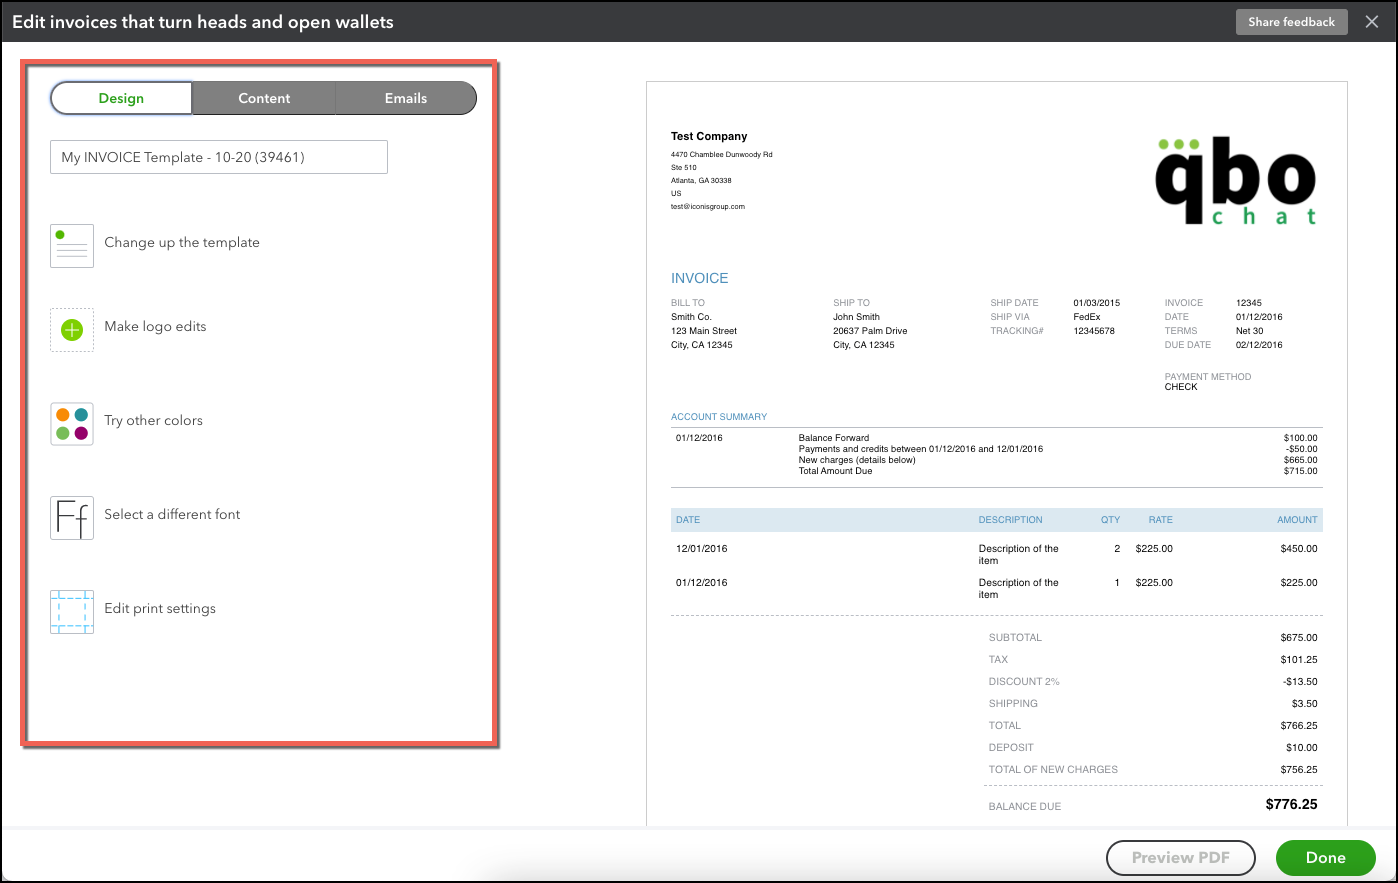
The Overall Design of Your Invoice Template
You can edit the design of your invoice in a few different ways.
Overall layout with the pre-defined options.
Upload your logo, change the size, and determine if it is left, center or right justified.
Define the accent color. Either stick with a black or gray or you can use one of the colors from your logo. You’ll need the HEX code from your logo. If you don’t have it, you can always search the internet for the HEX of the RGB colors you might have.
Change up the font and/or font size.
Update the page margins.
Determining the Content of Your Invoice
There are 3 main areas of your invoice:
The top – includes your contact information, your customer’s information, invoice date, terms, etc
The middle – includes the details of the charges
The bottom – the summary of charges, any taxes or discounts applied, and your total
Each section can then be customized further based on your needs
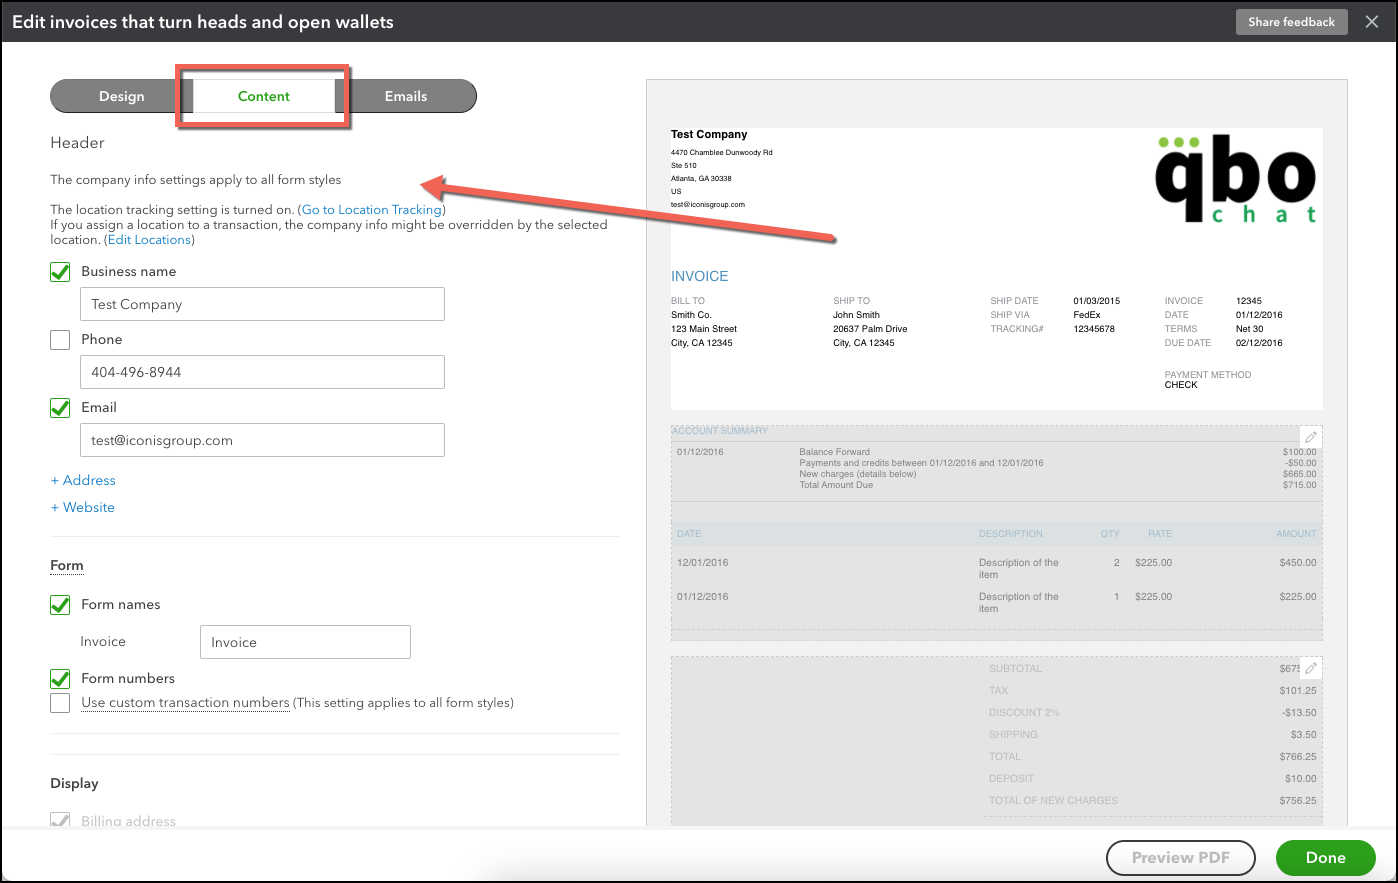
Customizing the Top of Your Invoice
The top of the invoice includes information about you and your customer.
Your Company Information
You can select what information you want to have shown on your invoice – name, phone, email, address, and website. Some companies include some of this information with their logo, so it could be redundant to have it listed again. And, sometimes you just don’t want to include everything because you don’t think it is something the customer needs.
Form
Here you can change the name of the form. I haven’t seen an example as to why you want to change it from invoice, but I’m sure there is a reason out there. I would recommend using form numbers so it is easier for you and your customer to track what has been invoiced and what has been paid. If you have more than one invoice for that customer, confusion is highly likely without this. As for custom transaction numbers, I’m not sure why you need them. I’ve seen several companies do this, but it just adds more time to create an invoice. It is highly unlikely that your customer will care if their invoice is numbered specifically for them or with just basic numbers.
Display
Here you have to include the Billing address, but you have the option to turn off the Shipping address. When you turn that off, then other shipping-related fields like Ship Date and Tracking number are also removed from your invoice.
You are also able to decide if you want the terms and due date shown on the invoice. You should definitely do this AND make sure you are enforcing those terms.
Under payment method, I couldn’t get this field to populate on an invoice. I think this is only relevant for Sales receipt forms since those include the payment on the form itself.
Custom Fields
In QuickBooks Online Plus, you are able to create 3 custom fields. This is where you could use your customer’s PO to help them track what the invoices relate to. You also have the option to either print the field or just have it as an internal field used for your own purposes. One interesting thing to note here is that if the field is blank when creating your invoice, the header will not show up on the printed invoice.
Customizing the Detail Lines of the Invoice
This is the meat of the invoice and explains to the customer what you are actually charging them for.
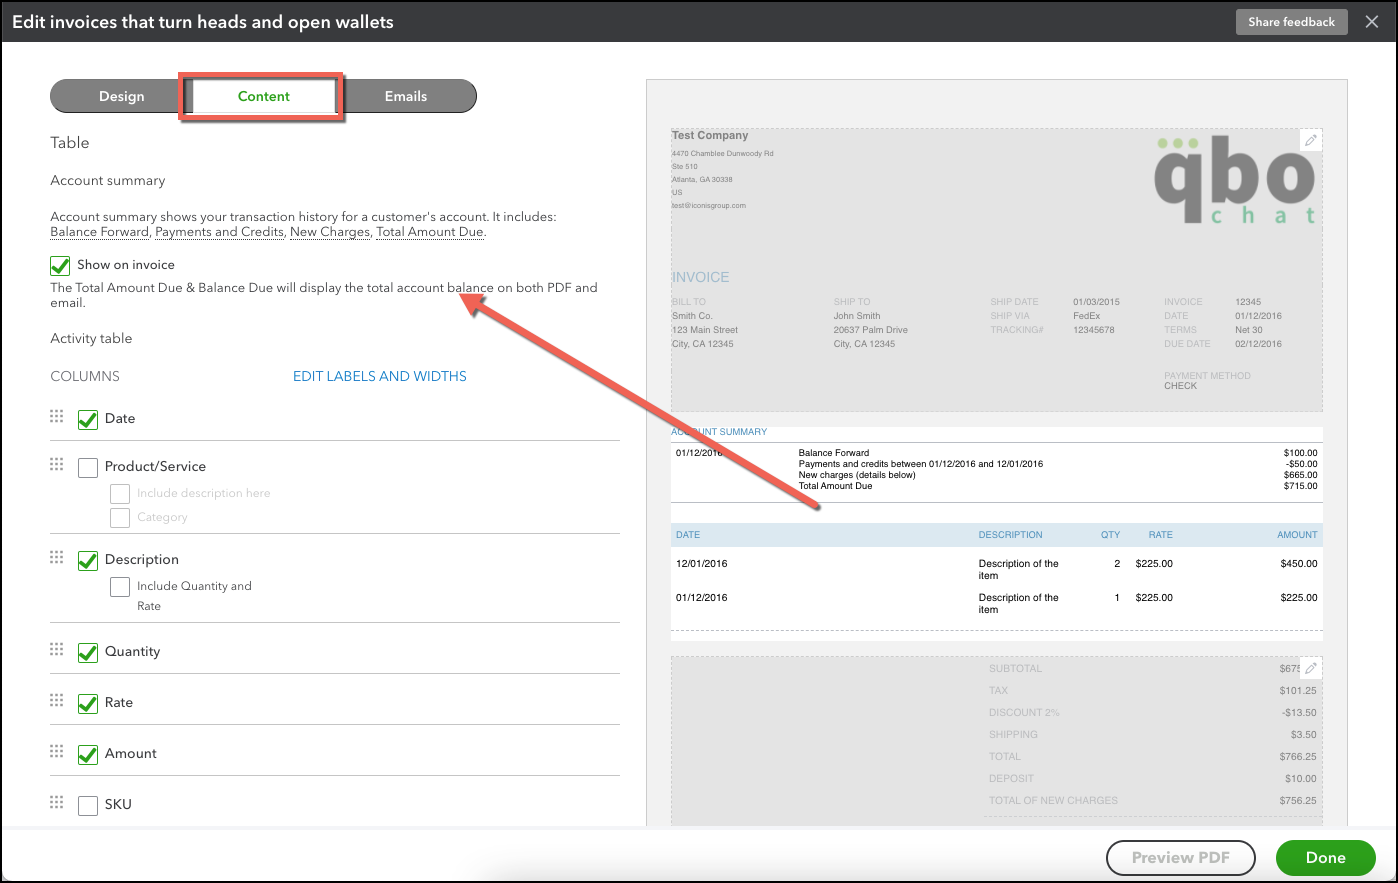
Account Summary
If you have a problem with customers paying their invoices on time, then you might want to include the account summary on your invoices. It shows the customer’s open balance, payments since the last invoice, new charges, and the current amount due. But beware when it comes to emailing these invoices. The total shown on the email will be the total of ALL charges. It is possible that some customers could see this on multiple emails and overpay you. I’ve seen it done. So, you just need to weigh the benefits of clearly communicating the open balance on each invoice versus how easily confused your customers may be.
Columns
As you can see, you have the option to select or deselect several things here. You can also group information together if needed. For example, you can have separate columns for quantity and rate or you can group that under the description column. You could also group the description and category under the product/service column. But, be careful because the more you group, the harder it can be to clearly see what is being charged.
You can reorder the columns but selecting and moving the dotted squares up or down. You can also edit the column names and widths.
The SKU is available here if you do use SKU’s in your business.
The “Show more activity options” gives you further options to group your lines. This is great if you want to summarize any time or billable expenses you are charging your clients. I personally don’t like the “collapse activity rows” because it doesn’t take into account the date. If you have several time activities for the same thing on different days, it will just put that all into one. Then imagine you do have other lines that have dates. I just think that could bring up more questions with the customer.
Note that if you are grouping by Type, that means it will group by charges, billable time, and billable expenses.
There are times that you might want to deselect the product/service column. That could be important if you label these based on something that is more recognizable internally (for time entry or something) and it isn’t something that your customers will understand. Remember that when you create products and services, you can include a default description. This could be used as the area where you enter information that is understandable to your customer.
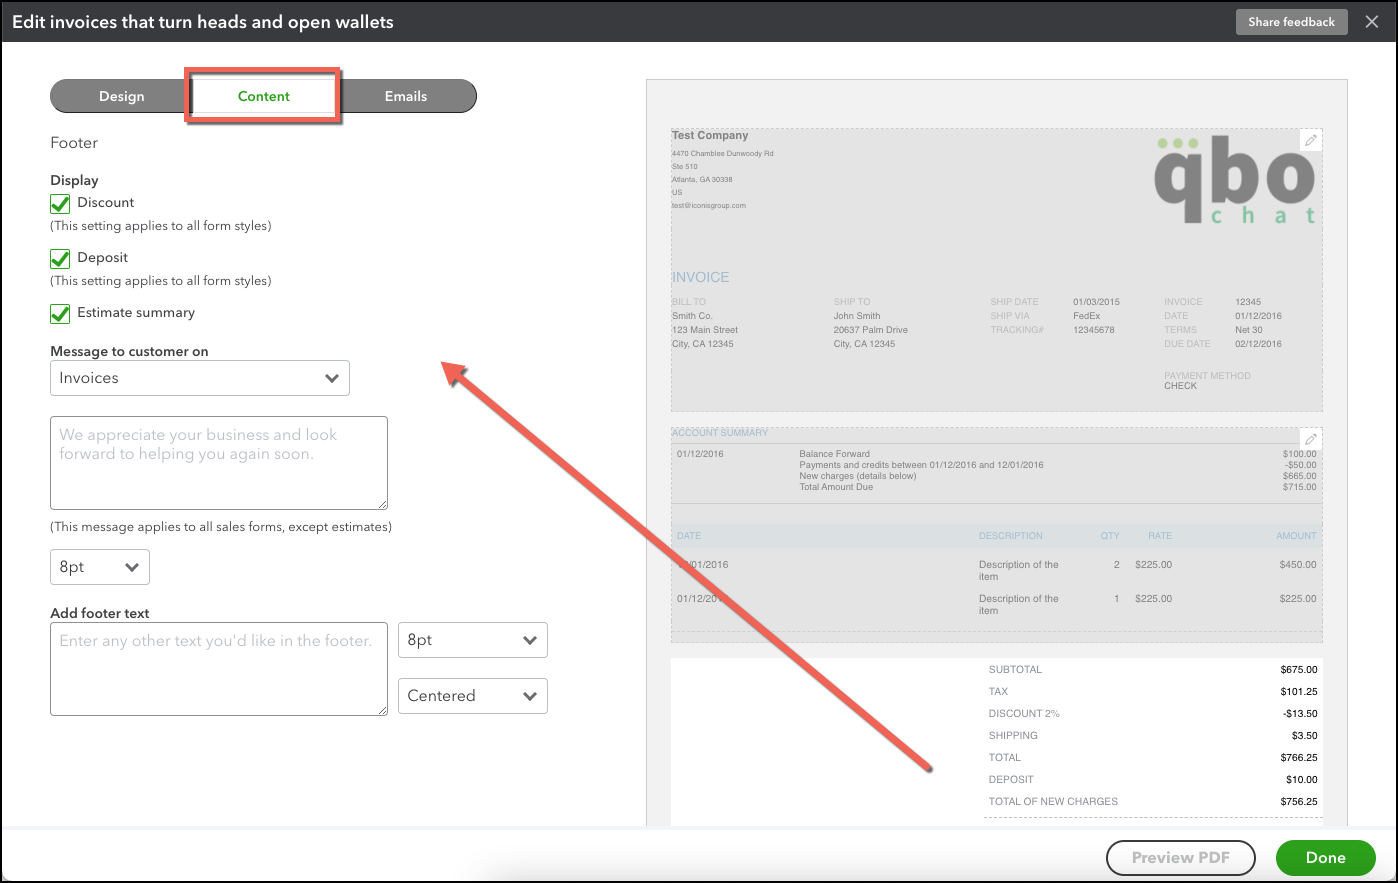
Customizing the Bottom of the Invoice
The final summary of the invoice clearly communicates what is owed. If you offer discounts or deposits, you can include those fields here. This is different than if you have created a product/service that is a discount or deposit. These are separate fields that act differently in QuickBooks Online.
You can include a message to the customer. This will show up to the left of any summary information. Like the custom fields available on the top of the invoice, if there is nothing entered into the message, then the field will be blank.
And, finally, you can include a footer in your invoice. In the past, I might have used this space to include the website, address, or phone number of the company just to mix up the design.
Customizing Your Invoice Emails
How your invoice appears in emails
You have the options to include the full details, summarized details, and then, include the PDF of the invoice. Here are my recommendations:
If your invoice has 1-2 line items, then full details are fine to include in the email. Otherwise, it is way overkill. The majority of the time, you’ll want to include summarized details.
You ALWAYS want to include the PDF of the invoice. I know that QuickBooks Online has that easy link to view and pay your invoice online, BUT if you work with a customer that has any sort of sophisticated accounting, then they will need the PDF for their records. Why make them click on a link to download it when it can just be included in the email?
Standard email
This is the area where you just set up the default language for each invoice email. Don’t make it super complicated. Most of the time, the pre-filled information provided by QuickBooks Online will be sufficient.
Just below, you also have the area to define the default language for your reminder emails.
Summary of How to Customize Invoices in QuickBooks Online
So, here is my quick summary of what you need to care about to customize your invoices for quick payment.
Include your company name and contact information – either in text or in your logo
Don’t worry too much about colors, fonts, and layouts. If you want to try to match your brand, then do that. Otherwise, the more simple it is, the easier it is for your customer to read it and pay you!
Use form numbers, but skip the effort to using the customer transaction numbers
If you use custom fields, just remember you don’t have to worry about including content in them. If it is blank, then it doesn’t show up on the invoice.
Include the account summary if you have any issue with customers paying you on time.
Keep your columns simple. Make sure all of the information is straightforward. The easier it is to read, then the less likely your customer will have questions.
Only use the other activity options if it is going to make the invoice easier for your customer to understand.
Don’t overthink messages on invoices or in emails. If it isn’t adding value, then don’t include it.
Always include a PDF in your invoice emails.
The moral of the story is that when invoicing, you want to be as clear and concise as possible. Provide your customers with EXACTLY the information they need to approve and pay your invoice. You don’t want to be stuck going back and forth explaining everything on there. You just want to get paid!
Cathy Iconis, CPA is the creator and facilitator of the weekly tweetchat #QBOchat and the website QBOchat.com - a community for QuickBooks Online Users.
She is also the founder of Iconis Group, an Intuit Top 20 Firm of the Future, that supports small businesses all over the United States with their bookkeeping needs.
She is a five-time recipient of the prestigious CPA Practice Advisor 40 Under 40 Award, given annually to just 40 people nationwide.